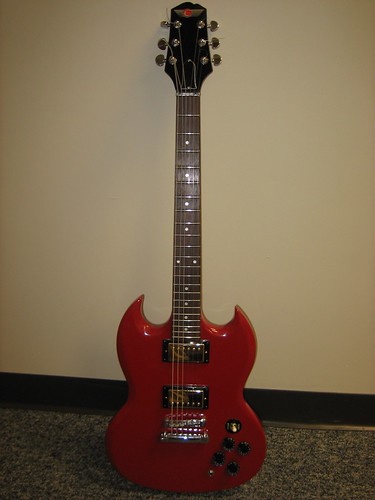
Starting about 6 months ago, my nephew was getting into playing guitar and was showing some real promise and skill. He already had a couple, but really had his eye on a red Gibson SG. Being as I didn't have the 1000+ dollars to get him one for Christmas getting him one was out of the question until I traded an old motorcycle for a couple of guitars.
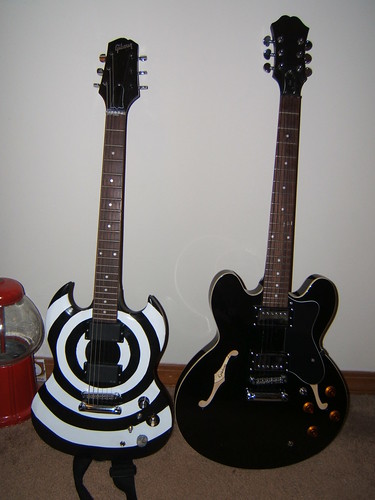 One of these was a very beat up and terribly modified Epiphone SG. It played pretty well (after an hour of tidying up ground loops and loose wires in the wiring cavity) but was still in terrible cosmetic and electrical shape. I read up a little and already had some experience working on guitars and figured that a custom painted and rebuilt guitar would be a nice gift and wouldn't be terribly hard. I was wrong.
I started by disassembling the whole thing down to it's base parts. I started a list of the problems with it.
Problems:
* Missing knob
* Ugly skull knobs
* Spray painted Zach Wyld bull's eye
* Flat black spray paint over entire rest of guitar
* Missing almost all pot/jack mounting hardware (washers, nuts, etc...)
* Chipped wood on back and under two knobs
* Grime and super glue stains on fretboard
* Roller nut attached by super glue
* Wiring (total rat nest)
* Stripped screws on a couple places
* Locking tuners missing top nuts
I could tell this thing would be a lot of work, but I also wanted to see if I could get it looking good, I wanted to give my nephew a nice axe, and I didn't have any money in it, so if I ruined it it wouldn't be too bad.
Next I needed to clean off the old paint. I thought the best way to do this would be with paint stripper. I liberally coated the back in paint stripper after a trip to the hardware store for supplies, but after getting through the top coat of spray paint, the factory candy apple red (damn! the color he wanted!) was too strong for the chemical to do much more than turn a little easier for me to pry loose from the wood than if it was dry. I moved on to trying to chip the paint off, since if the stock paint was in good condition I would be able to just restore that. That went out the window when the paint on the front had deep gouges where an exacto knife had been used to carve out some "sweet flames". I moved on to sandpaper.
stripper. I liberally coated the back in paint stripper after a trip to the hardware store for supplies, but after getting through the top coat of spray paint, the factory candy apple red (damn! the color he wanted!) was too strong for the chemical to do much more than turn a little easier for me to pry loose from the wood than if it was dry. I moved on to trying to chip the paint off, since if the stock paint was in good condition I would be able to just restore that. That went out the window when the paint on the front had deep gouges where an exacto knife had been used to carve out some "sweet flames". I moved on to sandpaper.60 grit sandpaper is a wonderful thing. Just a couple hours and what would be the start of
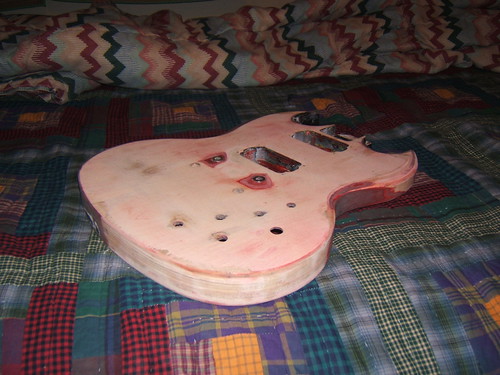 Popeye-like forearm muscles later, I'd gotten the SG down to it's bare wood. I'd gotten the paint off the neck with the side of my trusty paint scraping knife. I was on a roll, but before I started spraying paint all willy-nilly I decided to do some research. The articles on ProjectGuitar.com are a wonderful resource for restoring and repairing guitars, but the more I read, the more I realized that with less than two weeks before Santa made his rounds to gorge himself on cookies there was no way I'd be able to finish in time. Instead, I gave my nephew the bare wood body, neck, and a sandwich bag of electronics and mounting hardware, and told him I was sorry it wasn't done, but I'd have it done before his birthday. He was ecstatic and excited to have me building him a guitar.
In the mean time I also had to get some parts. The SG came with some very nice EKG pickups, which just happened to be the very same ones a friend of mine was looking to put into an explorer he'd just gotten. I was wanting to go with less heavy sounding pickups for a broader range, and the stock explorer pickups were just about exactly what I was looking for. I traded the pickups out of his guitar and helped install the EKGs, then went to get some knobs and pickup bezels (probably not the right term) since the ones that came with the SG were terrible and beat up.
I then got back to the finish for the body. I'd discovered that the bridge mounting holes, which I'd assumed were molded into the body, were actually metal. They'd just been too covered in paint to tell. I sanded the body down to 200 grit sandpaper since the 60 grit left the body about as smooth as velcro. I then sprayed several coats of clear over that to seal the wood, leaving each coat at least one day to dry between. I wanted this to look as close to a professional paint job as spray paint from Lowes would get me. With each coat I sanded the body to help slowly smooth out imperfections. it was pretty much the same story with the color coat and clear coat. Hang body in garage, choke on paint fumes, wait a couple days, sand, repeat.
As the body got smoother and shinier I felt
 better and better about the decision to go with spray paint. Cut to two months later (and about 4 months of off and on time into this project) and I'd gotten ready to spray the second of many coats of clear coat on. As I sprayed, the clear stopped being clear. It turned into a milky white leaving the guitar looking like I'd ruined the paint somehow. I didn't know what had gone wrong. I'd done everything the same as before, the clearcoat was from the same can, and it wasn't too humid. I went to bed since it was late and I didn't know what else to do.
I came out the next day after class to inspect the damage and to my wonder, the guitar was a nice shiny red again. It turned out that the clear coat just behaved that way, so I added the last 7 or so coats of clear (WHAT A PAIN!) and got ready to start wet sanding. By this point my forearms had gotten tough enough that I felt like I had the wrist strength to bend steel. I guess pressing on something and doing who knows how many reps of back and forward for a few months will do that. Wet sanding is interesting, you don't feel like you're doing anything and progress is so slow you have no idea when it'll be done since "just a little more" could easily mean from 1-3 hours. Anyway, my nephew's birthday on St. Patrick's day was coming up quick, so I dedicated every spare minute I had to getting this guitar done before then. Wet sanding takes forever.
After I'd gotten the body to as near a perfectly smooth surface as I could, I used rubbing compound on it to bring it to a nice shine. I could finally see myself in it and see the work I'd done starting to look like a finished part of a guitar. It was about 4 days before people around the world would start upchucking green beer.
I mounted The parts I could, but there was still a problem with the roller nut, I had no way to make it stay or figure out how high to mount it. I cleared off all the super glue in about an hour, and swapped the tuning machines from my other guitar onto the SG's headstock and wired the electronics that night (it was the day before the party. I'd have to work on it some from work the next day before the party.
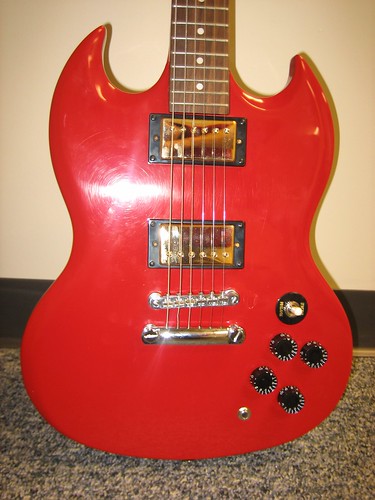 I wound up getting the last odds and ends finished, including a complete rewire since the one I'd done the previous night was totally wrong. Talk about cutting it close. I put the guitar in it's bag not even knowing if it worked and headed to present it. When I got to the party, I carried it in and told my nephew that I didn't get him anything other than the guitar for his birthday, but that since I'd already given him the guitar for Christmas, his birthday present was all the work, time, and brain cells I'd put into the guitar since then. It did wor and he loved it. People at the party could hardly believe him when he said I'd made it. I'm now known by his friends as "my uncle who made me the guitar". That kicks ass.
 If I'd known how much work it would take to do this before starting would I have done it? Maybe not, but I think this way it's worth a lot more than a guitar I'd bought. I hope he gets many years of use and enjoyment out of it. You can see more photos from making this guitar on this Flickr set.


No comments:
Post a Comment